
Table of Contents
- Introduction
- Background
- Tip 1: Seperate entities and models
- Tip 2: Layouts in Layouts
- Tip 3: About jQuery and bundling...
- Tip 4: Build your own basis
- Tip 5: Stay unobtrusive
- Tip 6: Passing in arrays of arrays
- Tip 7: Architecture your JavaScript
- Tip 8: Building pluggable areas
- Tip 9: Always think about NoJS
- Tip 10: Use LESS and TypeScript
- Tip 11: A "real" tab control
- Tip 12: Optimize database queries
- Tip 13: Generating content
- Tip 14: Automatic documentation for web API
- Tip 15: Use strongly typed views
- Tip 16: Customizing error screens
- Tip 17: Remove the ASPX view engine
- Tip 18: Include HTML functions
- Using the code
- Points of interest
Introduction
One year ago I published the article Practical ASP.NET MVC (3) tips, which has been quite helpful for a lot of people. Since the article is also a good reference for myself, I thought that publishing another article with some new tips might be a useful again.
What changed is that this time we'll focus on ASP.NET MVC 4. Most of the tips should still be applicable to older (and / or future) versions of ASP.NET MVC. There will be some tips about JavaScript interaction with ASP.NET MVC. Most tips will deal with user interaction and building up custom controls - controls that follow the principles of the modern web and MVC.
Some tips will be longer than others, some will be more trivial than others. I hope that everyone will find at least one or the other tip useful. Personally I like having a kind of reference for important things. Fragmentation is always a hard thing to cope with, which boosts my motivation towards unification.
Like last time be aware of the following disclaimer: This article will not try to teach you MVC, HTML, JavaScript or CSS. In this article I will give you a series of (mostly not-connected) tips, which could be helpful while dealing with ASP.NET MVC. Some of those tips might become obsolete with time, however, every tip will contain a lesson (or did contain one for me when I've been caught!).
Background
From the moment I've seen ASP.NET MVC I knew that this is the best solution for creating scalable, robust and elegant dynamic web applications. The separation of concerns makes it easy to keep track of everything - even in large web applications. A lot of smart people did a great job in engineering the ASP.NET MVC framework, which is (in its core) lightweight and flexible. This flexibility makes it easy to extend or bend to our needs.
The main problem, however, is that only a few people know about how to archive certain things. Personally, I always have a look at the source code of MVC, to get an idea of how things are implemented or how things are done there. In this article we are going to see some of the inner working of ASP.NET MVC, which will hopefully help us to understand why some code works and other does not.
In my work as a consultant I am doing more web lately than ever before. The web is moving fast and everyone wants to have a great web application it seems. This is a struggle from some companies, which will eventually learn (the hard way) that their architecture is too stiff, since it is only adjusted for client (desktop) applications. Things like stateless requests or multiple users are hard to implement upon their current architecture. Nevertheless in the end they always come up with an architecture that does not only fit their previous needs, but also all future needs.
So what is the real deal behind this article? These tips will go in the following directions:
- Following web principles
- Obeying designed architectures
- Reducing overhead
- Extending MVC to our needs
If you haven't tried out ASP.NET MVC, but you do know C# or the .NET-Framework (or even ASP.NET), then you should give it a shot right away! This article is the right choice if you did this, have a clue right now whats going on and if you want to learn more just in case. I can also recommend my previous article on ASP.NET MVC: Practical ASP.NET MVC (3) tips.
Tip 1: Help MVC in binding models
There are some limitations of the ASP.NET MVC model builder. Even though the builder is doing an almost perfect (and surely incredible) job in instantiating real objects from parameter strings (received in form of a variety of things, like the URL itself, query parameters or request content) it cannot instantiate some very particular objects from everyday strings like a simple date.
For writing our own model binders we only have to do two things:
- Write a class that implements the
IModelBinderinterface - Register your binder at the
ModelBindersclass
Let's make a sample implementation for the DateTime model binder. All we want is that by default the date format is given in the kind of weird format dd of MM (yyyy). This can be archieved by coding the following class:
public class CustomDateBinder : IModelBinder
{
  static readonly Regex check = new Regex(@"^([0-9]{1,2})\s?of(\s[0-9]{1,2})\s?\(([0-9]{4})\)$");

  public object BindModel(ControllerContext controllerContext, ModelBindingContext bindingContext)
  {
    var value = bindingContext.ValueProvider.GetValue(bindingContext.ModelName);
    var result = DateTime.Now;

    if (check.IsMatch(value.AttemptedValue))
    {
      var matches = check.Matches(value.AttemptedValue);

      if (matches.Count == 1 && matches[0].Groups.Count == 4)
      {
        try
        {
          int year = Int32.Parse(matches[0].Groups[3].Value);
          int month = Int32.Parse(matches[0].Groups[2].Value);
          int day = Int32.Parse(matches[0].Groups[1].Value);
          return new DateTime(year, month, day);
        }
        catch { }
      }
    }
    else if (DateTime.TryParse(value.AttemptedValue, CultureInfo.InvariantCulture, DateTimeStyles.None, out result))
      return result;

    bindingContext.ModelState.AddModelError(bindingContext.ModelName, "The value does not represent a valid date.");
    return null;
  }
}
We use a regular expression since the parsing mechanism of DateTime (usually by picking the ParseExact method with a formatting string) is not suited for our needs. We don't want to be caught off guard by inserting some invalid numbers, which is why we wrap the instantiation of the DateTime instance with a try-catch block. Still old formats should work which is why we just use a plain TryParse.
Registering the binder should be done in the Application_Start method found in the Global.asax.cs file. Usually one would create a method that does all the registering. For our case we only need to register two additional binders:
public static void RegisterBinders()
{
  ModelBinders.Binders.Add(typeof(DateTime), new CustomDateBinder());
  ModelBinders.Binders.Add(typeof(DateTime?), new CustomDateBinder());
}
Here we just register both, since Nullable<T> conversions will be performed automatically.
Remark One could of course grab the previously registered binder for DateTime and use it in the freshly created instance. Most of the time this makes much more sense than trying to do the usual binding in the rest of our own implementation.
Now there are several gotchas that should be noted:
- Our desired format works on the server, but the client-side validation will not work (out-of-the-box)
- In this simple case everything works, even previously supported formats, but this in not always the case
The most critical point is actually client-side validation. Usually we want to activate this, to provide a much nicer user-experience. But what if this little script will block the user from submitting a valid form? So we have to extend the client-side validation (jQuery.validate) with our own code. Since we do not want change the original script directly (otherwise our changes would be overwritten once we receive an update), the best solution is actually to write another script file.
Let's call this script file jquery.validate.custom.js and let's add the following code:
(function ($, undefined) {
  var oldDate = $.validator.methods['date'];
  $.validator.addMethod(
    "date",
    function (value, element) {
      if (/^([0-9]{1,2})\s?of(\s[0-9]{1,2})\s?\(([0-9]{4})\)$/.test(value)) {
        alert('Hi from our own client-side validation !');
        return true;
      }

      return oldDate(value, element);
    }, "The given string is not a valid date ...");
})(jQuery);
The code looks actually more complicated than it is. Basically we are just fetching the (current) date validation function, adding (which is replacing) the new validation function and setting a validation message. If the string seems legit, we are also showing an alert (this is just as a proof and should be removed for any productive purposes).
Tip 2: Layouts in Layouts
Sometimes we just build a framework for our homepage. In this framework we will actually leave a lot of things open for areas or webpages to change. A good way to accomplish this flexibility is by using layouts in layouts.
For using a layout in a layout all we need to do is specifying the new layout within the view. If we do this within an area we might only specify the new area in the area's _Viewstart.cshtml file. Now the interesting part happens in this new layout:
@{
  Layout = "~/Views/Shared/_Layout.cshtml";
}

<div class="row">
  <div class="span2">
    <!-- specify new stuff here -->
  </div>

  <div class="span6">
    @RenderBody()
  </div>
</div>
As usual for a layout we are calling the RenderBody method. However, the new thing here is that we are specifying another Layout again. This specification is very crucial and includes the current layout in the specified one.
Another thing to note here is that one can turn off the parent (or any parent) layout easily but just applying Layout = null, e.g.:
@{
  Layout = null;
}
@* Start something completely new here! *@
Tip 3: About jQuery and bundling...
jQuery is a really amazing JavaScript library. It provides a lot of interesting features and has a very good architecture. The whole design of jQuery is the foundation of its success, which also started a new wave of web development efforts. Even though I always felt that it is the best to use jQuery from a CDN, or (if not) obtain and update it via the NuGet feed I am now strongly against doing it that way.
There are several reasons for not updating jQuery (at least not automatically). Usually we are dealing with a bunch of jQuery plugins (which are either our own or the third-party) and we, as well as others, are making assumptions about the state of the jQuery API. However, sometimes the state of the API is much more fragile than one thinks. This results in a removal or modification of the current state.
If we now just update jQuery blindly (which might happen easily if we have it in NuGet) or instantly (over a CDN), we might get trouble with one or more of our plugins. This happened to me a couple of times and since I am not in the mood of debugging those third-party plugins (sometimes I am, but usually I do not have the time), I am no strongly against such (automatic) updates. These updates should be evaluated and tested first.
Removing jQuery from NuGet is quite easy and straight forward. We just fix the version and now that everything is in a determined state we should also think about determining the bundling. Of course just including a whole directory is very efficient, but sometimes the order is important. I always recommend a basic structure like:
Scripts/
Scripts/abilities
Scripts/plugins
Scripts/...
In scripts we place the main files, e.g. jquery.js or page.js (if you want to name the page's main JavaScript file that way). The plugins folder contains only jQuery plugins, which makes their order arbitrary. Here should not be any dependencies (other than files that are placed in the root directory).
Let's have a look at a sample configuration for the RegisterBundles method.
public class BundleConfig
{
  public static void RegisterBundles(BundleCollection bundles)
  {
    //Determine the perfect ordering ourselves
    bundles.FileSetOrderList.Clear();

    //jQuery and its plugins!
    bundles.Add(GetJquery());

    //Separate the page JS from jQuery
    bundles.Add(GetPage());
  }

  static ScriptBundle GetJquery()
  {
    var jquery = new ScriptBundle("~/bundles/jquery");
    jquery.Include("~/Scripts/jquery.core.js");
    jquery.Include("~/Scripts/jquery.validate.js");
    jquery.Include("~/Scripts/jquery.validate.unobtrusive.js");
    jquery.IncludeDirectory("~/Scripts/plugins/", "*.js");
    //More to come - or even plugins of plugins (subdirectories of the plugins folder)
    return jquery;
  }

  static Bundle GetPage()
  {
    var page = new ScriptBundle("~/bundles/page");
    page.Include("~/Scripts/page.js");
    //and maybe others
    return page;
  }
}
Why do we need to reset the ordering over FileSetOrderList? Well if we do not clear the default values then renaming jquery.js to jquery.core.js will (for instance) have the effect of loading jQuery after e.g. jquery.validate.js, since the name of this file is in the priority list, while jquery.core.js is not.
Tip 4: Build your own basis
If we derive our controllers directly from Controller we might get in trouble in the future. It is much better to use an abstraction that is (from the code's perspective) in our own hands.
Usually I call my own base controller just BaseController, but sometimes other names fit better. Such a controller would contain methods that are used across all other controllers. In principle such a controller might also contain actions, even though usually this is not the case.
A quite useful start might be having the following structure:
public abstract class BaseController : Controller
{
  protected static String MyName([CallerMemberName] String name = null)
  {
    return name;
  }
}
This method could be used in any action (or other method) to determine the name of the action. The result is one string less, that could be wrong, if we are require to pass in the string of the current action somewhere.
Tip 5: Stay unobtrusive
One of the best things about the guys behind ASP.NET MVC is that they understand the web. The separation of concerns is not only important in the server-side architecture (Model-View-Controller), but also on the client-side (Description-Style-Interactivity, i.e. HTML-CSS-JavaScript). This means that HTML should not contain any CSS or JavaScript. Inline styling is really not a good thing to consider (even though there are situations where it makes sense, especially in debugging or playing around). The same applies for using JavaScript within HTML. This means that <script> tags which contain content (usually JavaScript) should be avoided.
The answer to this problem is of course unobtrusive JavaScript. Here we are setting our options in form of HTML attributes (usually data-* attributes). The JavaScript(s) pick up the element due to some class / and or other attributes being set. This is actually how the (client-side) validator (jquery.validate.js) gets its information. There is also another JavaScript file called jquery.validate.unobtrusive.js, which picks up those elements and feeds the original validator script with the found elements.
It makes sense to either build our own controls with an (optional) unobtrusive model, or to write our own wrapper. Let's consider the following example of a (third-party) datepicker control in the file jquery.datepicker.js. Actually the control itself is not unobtrusive, which is why we create a new file called jquery.datepicker.unobtrusive.js. All we need is the following content:
$(function () {
  $('input.pickdate').each(function () {
    var options = {};

    for (var name in this.dataset)
      options[name] = isNaN(this.dataset[name] * 1) ? this.dataset[name] : this.dataset[name] * 1;

    $(this).datepicker(options);
  });
});
What is done here? Not much, we pick up all elements that fit a certain unobtrusive criteria (in this case all <input> elements with the class pickdate being set) and iterate over them. We then get all data-* attributes and put them in an object called options. Finally we invoke the jQuery plugin with the created options.
In our MVC view we can now write code like the following:
@Html.TextBox("mydate", DateTime.Now, new { @class = "pickdate", data_week_start = "4", data_format = "dd-mm-yyyy" })
And without any additional JavaScript code a datepicker control will be created - unobtrusively as preferred.
There are two things to remark here:
- We make a short evaluation if the given value is a number. If it is a number we store it as a number. One could be more intelligent or specific here, like doing this conversion only for certain names or including conversions to boolean etc. if certain names are matched.
- In MVC we can only name lowercase attributes, however, a little trick helps us: If we name something data_week_start then the outcome will be (in HTML) data-week-start. This attribute name will actually be translated to JavaScript as dataWeekStart, i.e. the
datasetproperty will give us a key in form ofweekStart.
Staying unobtrusive gives us more flexibility and easier maintenance.
Tip 6: Passing in arrays of arrays
Rarely we have a form that might contain an array. Even more rarely we have a form that contains an array, which again contains an array. In my case I had a complex JavaScript control, that could add, edit or remove entries. All operations would be tracked and send to server, once the user decides to save by clicking on a button. The submission had been done by an AJAX call (over jQuery).
What one would expect is a structure like IEnumerable<GridStateSaver<RowData>>. In this case RowData is just a model with some data (like an id, a name and so on). The generic class GridStateSaver looks the following:
public class GridStateSaver<T>
{
  public GridSaveState State
  {
    get;
    set;
  }

  public IEnumerable<T> Rows
  {
    get;
    set;
  }
}
public enum GridSaveState
{
  Added,
  Updated,
  Deleted
}
So all in all we are just enumerating over all possible changes, where we receive the whole batch of rows with the same modification type (add, update, delete). Using jQuery for the job we receive a quite nice response with everything being used with array index notation. However, even though ASP.NET MVC finds the right number of states being transmitted (e.g. 2 for only add and update or 1 for only delete etc.), it does not go further down the tree to instantiate rows or set the state.
The signature of the action in the MVC controller looks like this:
public ActionResult ActionName(IEnumerable<GridStateSaver<RowData>> states)
{
  /* ... */
}
Now that we already dicussed that the straight forward way does not work, let's see a way that works. Suppose we have stored our information in an array called data. The following code would post this array as a stringified JSON object:
$.ajax({
  contentType: 'application/json; charset=utf-8',
  url: /* place URL to post here */,
  type: 'POST',
  success: /* place success callback here */,
  error: /* place error callback here */,
  data: JSON.stringify({ states : data })
});
This approach works quite nice, because MVC will automatically detect the transmission as being done via JSON. This way is also faster than the usual detection, because JSON has a direct array notation. Therefore use JSON for posting complex data with JavaScript.
Tip 7: Architecture your JavaScript
A very important part of every web application is the JavaScript that basically connects all included JavaScript files and the webpage. Usually everything starts with one of the following blocks (using jQuery):
$(function() {}
  /* Content */
);

$(document).ready(function() {
  /* Content */
});

$(window).load(function() {
  /* Content */
});
While this approach has a lot of benefits it has also one disadvantage: There is no object to communicate with (possible) other scripts. Or to say it differently: this method is not pluggable. This can be fixed by providing such an object, either by using the window object explicitly as a host, or by creating a global object. The global object could also be placed in another JavaScript file.
Another advantage of such an approach is that the global object could also give access for debugging information for instance. Let's design a very simple global container (just as an object, even though there are more advanced and better ways to do that):
var app = {
  initialized: false,
  path : '/',
  name : 'myapp',
  debug : [],
  goto : function() { /* ... */ }
};
Such a central object has many other advantages as well. Of course it is most useful if we build something like a single-page-application, where additional JavaScripts might be required for some pages. In such cases one could do the following:
var app = {
  queue : [],
  load : function(callback) {
    app.queue.push(callback);
  },
  run : function() {
    for (var i = 0, n = app.queue.length; i < n; i++)
      (app.queue[i])();

    app.queue.splice(0, n);
  },
  /* ... */
};
So every (additional) JavaScript will run code like
app.load(function() {
  /* additional code to load */
});
instead of the usual wrapped code
$(function() {
  /* additional code to load */
});
Now such an architecture could then be used for any kind of modular experience one would wish. The loading functions could do additional bindings, activating some slick animations or just setting up some more specialized controls.
Tip 8: Building pluggable areas
Sometimes customers have special requirements. They want to modularize their web project, but they do not want to include areas in the same project. Of course such a treatment is possible, however, archiving this is not straight forward. There are several possible ways and every way has benefits and disadvantages. Let's look at some of the possible solutions:
- Code the area in the same solution and turn on / off sections of the code within the code.
- Create a new project that is located in the Areas subfolder of the main application.
- Create a new project and only place the resources (views, scripts, ...) in the Areas subfolder of the main application. Insert these files as links in the new project.
- Create a new project and run a post-build event to copy the resources to the Areas subfolder.
- Create a new project and mark resources as embedded. Use a virtual path provider to reach those resources.
In my opinion the best solution is of course number 1. But this is not a solution for the original problem - to make everything pluggable by adding / removing just a single library (*.dll file)! Therefore option number 2-4 are also excluded, since these options have additional files to be transported. It should be noted, however, that NuGet would make such a process very elegant and easy.
So if a company would go for number 4, it would certainly have several benefits. The pluggable architecture would be provided by NuGet - if a (not-yet-used) NuGet package is found, it would be installed automatically (resources would be copied and the library would be placed). Otherwise NuGet packages could also be removed - which would result in a clean removal of the library, as well as the resources.
Nevertheless in this tip we will have a look at number 5. Since writing our own virtual path provider is tedious, we will use the MvcContrib library. What we get in the end is a web application that is centered around a central application, with pluggable modules being packaged in libraries.
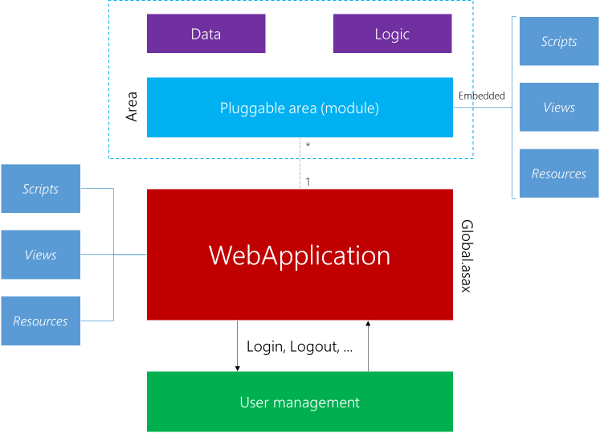
The MvcContrib library does much more for us then only providing the abstract PortableAreaRegistration class, that we need to derive from for our portable area. It also provides the message bus, which is now included in the Mvc architecture out-of-the-box. The message bus couples two (otherwise loosly coupled) modules together, i.e. it helps us to establish a connection from the portable area to whatever web application and vice-versa.
Tip 9: Always think about NoJS
Nowadays nearly every (major) webpage offers a lot of interactivity and features. However, the real test is not if a webpage is really interactive and useful when users have JavaScript activated, but when JavaScript is not available. Of course this test will fail miserably in some obvious cases (try making a real-time game (like a jump and run) without JavaScript, or a painting program), where high interactivity is required.
However, in most cases the test should not fail. If the webpage is not usable any more without JavaScript, then something is terribly wrong. Think about Amazon requiring JavaScript for your checkout process. Most people would not be affected, but those few who either can't enable JavaScript in their browser (due to company policies) or don't want to turn it on (due to security concerns), cannot spend money on the webpage. In consequence Amazon will make less money.
If we have parts on the page that will be modified from a JavaScript it is quite easy to add some NoJS fallback. Consider the following:
<div class="loadfeed">
<noscript>This feature requires JavaScript.</noscript>
</div>
It's that easy! As long as the deactivated features are clearly marked and not required for operating the page everything's fine. However, the real NoJS has to come to our mind when thinking about form controls or related user interaction elements. Obviously our application has to be independent of such controls. If we use them, it must be self-explanatory that such controls would only enhance the user's experience, but not be mandatory for it.
Consider the following example: We include a datepicker control on our webpage.
<input type="date" class="datepicker" placeholder="Please enter a date in the format DD-MM-YYYY" />
If JavaScript is enabled we pick up all <input> tags with the datepicker class set. Then we will hide the original input and show a different one (with the datepicker). This solution is quite robust. Why?
- If users have a browser capable of the HTML5 input elements a "native" datepicker will be shown.
- If the user's browser does not know the date input, but the placeholder attribute, a hint will be shown.
- If users have a quite old browser they still have a textbox. Validation is still to be done on the server-side, so inserting the wrong format will not be harmful.
- If the user has JavaScript activated, then he will get a much superior control anyway.
Of course sometimes more effort is required to provide such a flexible way of accessing things. Sometimes it might be impossible to provide a proper client-side solution for people without JavaScript. Nevertheless in most cases it is worth the additional effort.
This is how the demo looks without JavaScript being active:
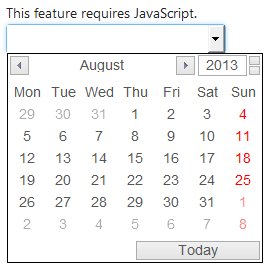
It is worth testing the webpage / web application at least once without JavaScript being active.
Tip 10: Use LESS and TypeScript
In our code (C# or JavaScript) we always try to follow some principles like DRY or SOLID. We architecture everything and encapsulate data. Why aren't we doing the same thing with CSS? Variables would be a great starting point, followed by mixings and included hierarchy selectors. This is basically what LESS offers. I actually had my doubts due to the problems with distributing LESS stylesheets (a transpiler is required, since deliviering another JavaScript for it sounds like the completely wrong solution to me). Needless to say that Visual Studio has the perfect answer already included: a plugin called Web Essentials.
This plugin automatically saves LESS stylesheets additionally the CSS and minified CSS format. Therefore we can simply bundle / distribute CSS without having to think much about LESS or stylesheet preprocessors in general.
It's very similar with TypeScript. TypeScript is actually JavaScript and gives us a set of amazing features out-of-the-box. While LESS comes with web essentials, TypeScript (additionally) needs to be downloaded and installed. The whole process does not hurt and begins at the Download Center.
Again every TypeScript (.ts) file will be saved automatically as a JavaScript (.js) and minified version that ends with .min.js. So no real burden here, just use it!
As a final remark: If we want to use TypeScript efficiently then we might want to add TypeScript definition files *.d.ts. There is even a good database online. Additionally one should include references to other included JavaScript files by dragging them into the editor.
Tip 11: A "real" tab control
Quite often we want to group content in tabs. Tabs will require us to write 3 things:
- Some CSS code, which displays the tabs in the right way.
- Some JavaScript code to show the right tab on clicking the corresponding header (and more).
- Actual HTML code to group the contents and place the headers.
Writing a little extension for generating such tabs sounds therefore like a good plan. In the end we want to generate HTML like this:
<div class="tabs">
  <ul class="tabs-head">
    <-- For every tab we need the following -->
    <li>
      <-- name of the tab -->
    </li>
  </ul>
  <div class="tabs-body">
    <-- For every tab we need the following -->
    <div class="tab">
      <-- content of the tab -->
    </div>
  </div>
</div>
This HTML could be styled the right way (to look like tabs) with the following CSS code:
ul.tabs-head {
  display: block;
  list-style: none;
  border-bottom: 1px solid #ccc;
  margin: 0;
  padding: 0;
}

ul.tabs-head li {
  display: inline-block;
  margin: 0 10px;
  border: 1px solid #ccc;
  position: relative;
  top: 1px;
  height: 25px;
  padding: 10px 20px 0 20px;
  background: #eee;
  cursor: pointer;
}

ul.tabs-head li:hover {
  background: #fff;
}

ul.tabs-head li.active-tab {
  border-bottom: 1px solid #fdfdfd;
  background: #fff;
  font-weight: bold;
}

div.tabs-body {
  border: 1px solid #ccc;
  border-top: 0;
  padding: 10px;
}
Of course we also need a little bit of JavaScript to make this work smoothly. The simplest solution (without remembering the tab etc.) could be written like this:
; (function ($, undefined) {
    $.fn.tabs = function () {
        return this.each(function () {
            var links = $('ul.tabs-head > li', this);
            var tabs = $('.tab', this);

            var showTab = function (i) {
                links.removeClass('previous-tab next-tab active-tab')
                    .eq(i).addClass('active-tab');
                if (i > 0) links.eq(i - 1).addClass('previous-tab');
                if (i < links.length - 1) links.eq(i + 1).addClass('next-tab');
                tabs.hide().eq(i).show(i);
            };

            links.each(function(i, v) {
                $(v).click(function() {
                    showTab(i);
                });
            });

            showTab(0);
        });
    };
})(jQuery);
Now we need to wire up everything. First we want to make an extension method that constructs such a tabs control. The problem here is, that the HTML is not sequential. We have to places where we need to enter data from our tabs (one place for all the titles and another one for all the content). Of course one could solve it by splitting the extension method into two parts, however, this would not be very elegant.
Therefore we go for a solution that will feel very close to the BeginForm extension method. The extension method is quite simple:
public static TabPanel Tabs(this HtmlHelper html)
{
    return new TabPanel(html.ViewContext);
}
That does not look too complicated! In the end we use it like
@using(var tabs = Html.Tabs())
{
    @tabs.NewTab("First tab",
    @<text>
        <strong>Some content (in first tab)...</strong>
    </text>)

    @tabs.NewTab("Second tab",
    @<text>
        <strong>More content (in second tab)...</strong>
    </text>)
}
Obviously there is some magic going on in this TabPanel class. Let's see the implementation:
public sealed class TabPanel : IDisposable
{
    Boolean _isdisposed;
    ViewContext _viewContext;
    List<Func<Object, Object>> _tabs;

    internal TabPanel(ViewContext viewContext)
    {
        _viewContext = viewContext;
        _viewContext.Writer.Write("<div class=\"tabs\"><ul class=\"tabs-head\">");
        _tabs = new List<Func<Object, Object>>();
    }

    public MvcHtmlString NewTab(String name, Func<Object, Object> markup)
    {
        var tab = new TagBuilder("li");
        tab.SetInnerText(name);
        _tabs.Add(markup);
        return MvcHtmlString.Create(tab.ToString(TagRenderMode.Normal));
    }

    public void Dispose()
    {
        if (!_isdisposed)
        {
            _isdisposed = true;
            _viewContext.Writer.Write("</ul><div class=\"tabs-body\">");

            for (int i = 0; i < _tabs.Count; i++)
            {
                _viewContext.Writer.Write("<div class=\"tab\">");
                _viewContext.Writer.Write(_tabs[i].DynamicInvoke(_viewContext));
                _viewContext.Writer.Write("</div>");
            }

            _viewContext.Writer.Write("</div></div>");
        }
    }
}
The main principle is quite easy: We are writing directly to the ViewContext. In order to archive this non-sequential stuff, we are buffering the contents of the tabs (while sequentially writing out the headers). In the end we are closing the head, flushing all the content and finalizing the container's HTML.
In order to buffer the content we are using a little trick with an automatic conversion to a function delegate by the view generator. This trick has one drawback: Other helpers that also write directly to the ViewContext are useless within tabs (most popular example: the BeginForm method). Here we would be required to write manual HTML or use another helper, which directly returns MvcHtmlString.
Now we just need to wire up our jQuery tabs plugin with the generated content:
$(function() {
  $('div.tabs').tabs();
});
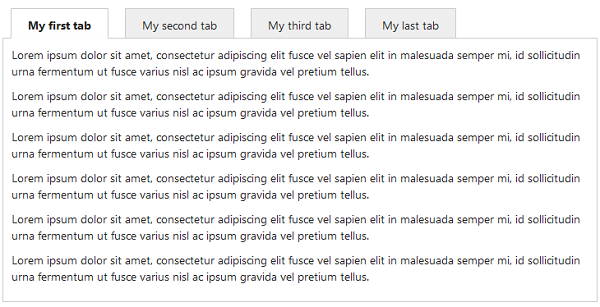
Finally the outcome could look as shown in the image below.
One problem with this is that it is really not suited for smaller screen sizes (e.g. on mobile devices). This can be changed by simply adding the following CSS code:
@media only screen and (max-width: 540px) {
  ul.tabs-head {
    position: relative;
  }

  ul.tabs-head li {
    display: none;
    margin: 0;
    height: auto;
    padding: 0;
    cursor: default;
    overflow: hidden;
  }

  ul.tabs-head li:hover {
    background: none;
  }

  ul.tabs-head li.active-tab {
    display: block;
    background: none;
    font-weight: normal;
    padding: 10px 50px;
    font-size: 24px;
  }

  ul.tabs-head li.previous-tab, ul.tabs-head li.next-tab {
    color: transparent;
    display: block;
    position: absolute;
    width: 32px;
    height: 32px;
    top: 10px;
    border: 0;
    z-index: 100;
    cursor: pointer;
  }

  ul.tabs-head li.previous-tab {
    left: 10px;
    background: url(images/back.png) #ffffff;
  }

  ul.tabs-head li.next-tab {
    right: 10px;
    background: url(images/next.png) #ffffff;
  }
}
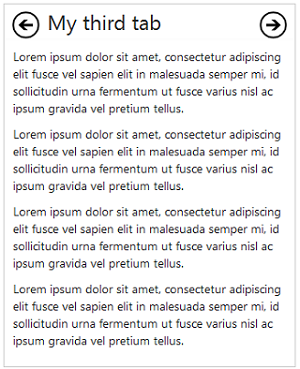
The 540px value determines the threshold. Below this value we will have the responsive design enabled. This value might be too low (depending on the amount of tabs), so a higher value might be better. This is how it looks:
Tip 12: Optimize database queries
One of the biggest performance killers of webpages is the database system. This is the central brain of the application and somehow fragmenting it into replicas with some internal synchronization is a real boost. The only thing that we can actually do for minimizing database load (and therefore minimizing page generation time as well as maximizing the number of requests per minute) is to improve the queries we write.
As discussed in the last set of tips we should always use a DAL to communicate with our database. A possible way is to use the Entity Framework. It is free, contains a lot of great features and is all-in-all a very robust implementation. Optimizations fall into the following categories:
- Caching
- Condensing
- Reducing
- Merging
- Avoiding
Selects that do not change in a while (or only in certain time-intervals) could be cached. Some queries could be written with less statements and / or resulting in a much better query path. Also the number of returned values might be bigger than required, which is again another source of optimization. Of course if we could avoid a query completely or merge multiple queries into one query, we gain a lot of performance.
Let's have a look at some examples to understand where those categories can be applied. Let's start with the following uncached query:
User GetUser(Guid id)
{
  return Db.Users.Where(m => m.Id == id).FirstOrDefault();
}
Now we might replace this with something that works like the following piece of code:
User GetUser(Guid id)
{
  return HttpRuntime.Cache.GetOrStore<User>(
    "User" + id,
    () => Db.Users.Where(m => m.Id == id).FirstOrDefault()
  );
}
A very simple implementation for this GetOrStore method could be done as shown below.
public static class CacheExtensions
{
  public static T GetOrStore<T>(this Cache cache, String key, Func<T> generator)
  {
    var result = cache[key];

    if(result == null)
    {
      result = generator();
      cache[key] = result;
    }

    return (T)result;
  }
}
However, we should note that this caching algorithm does not contain any discard policy. Hence this is a memory leak. In productive environments one should always think about suitable discard policies before enabling a cache system.
So what is condensing about? Sometimes one writes a too complicated query. Simplifying the query or making it more lightweight is therefore one of the greatest possible performance boosts. It is hard to give an example in LINQ here, so we are just using some plain SQL.
Consider the following SQL:
SELECT  *
FROM    mytable mo
WHERE   EXISTS
        (
          SELECT  *
          FROM    othertable o
          WHERE   o.othercol = mo.col
        )
Now we replace this with a JOIN:
SELECT  mo.*
FROM    mytable mo
INNER JOIN othertable o on o.othercol = mo.col
Overall condensing is not about writing the query shorter, but more efficiently. This should yield a faster execution plan.
Reducing does not require any example. Most of the time we are fetching too much data from the database. Even when we are interested in all the books that have been bought by a particular user, are we really interested in all the book data, too? Or would it be enough to return the ids and names of those books?
The fourth category, merging is explained by a very illustrative example.
public IEnumerable<Book> GetPurchasedBooksBy(String userName)
{
  var userId = Db.Users.Where(m => m.Login == userName).FirstOrDefault();

  if(userId != null)
  {
    var books = Db.Books.Where(m => m.FKBuyer == userId).ToEnumerable();
    return books;
  }

  return Enumerable.Empty<Book>();
}
Why do we need two queries if everything can be done with one query? The code would also be much more straight forward then:
public IEnumerable<Book> GetPurchasedBooksBy(String userName)
{
    return Db.Books.Join(
      Db.Users.Where(m => m.Login == userName),
      m => m.FKBuyer,
      m => m.Id,
      (book, user) => book
    ).ToEnumerable();
}
Here we are joining both tables on the foreign key that maps to the user's primary key. Additionally we are obeying our username constraint and we are just interested in the books.
Finally avoiding is just skipping queries that are actually not required. The king of such queries is usually executed by inexperienced users, who are using powerful frameworks:
public List<User> GetCreatedUsers(Guid id)
{
  return Db.Users.Where(m => m.Creator.Id == id);
}
This only works, when the ORM is quite good. But even then there is a left outer join required to perform this query. It would be much better to use the (already placed) foreign key:
public List<User> GetCreatedUsers(Guid id)
{
  return Db.Users.Where(m => m.FKCreator == id);
}
Not much difference but always a better choice (even though some ORM might optimize the case above).
Tip 13: Generating content
There are cases where all we want to do is showing an overview of what actions are possible. Usually this is within the area of a particular controller. In such scenarios reflections comes in very handy.
If we combine reflection with the usage of attributes we are getting self-generating code. All we need to do is write a nice re-usable interface. Let's consider the following class:
public static class Generator<TController, TAttribute>
  where TController : Controller
  where TAttribute : Attribute
{
  public static IEnumerable<Item> Create()
  {
    var controller = typeof(TController);
    var attribute = typeof(TAttribute);

    return controller.GetMethods()
      .Where(m => m.DeclaringType == controller)
      .Select(m => new
      {
        Method = m,
        Attributes = m.GetCustomAttributes(attribute, false)
      })
      .Where(m => m.Attributes.Length == 1)
      .Select(m => new Item
      {
        Action = m.Method,
        Attribute = (TAttribute)m.Attributes[0]
      });
  }

  public class Item
  {
    public MethodInfo Action
    {
      get;
      set;
    }

    public TAttribute Attribute
    {
      get;
      set;
    }
  }
}
With the information of the controller and the attribute type we are iterating over all actions of the given particular controller. Finally we are generating some kind of temporary object (but not anonymous, since otherwise we would lose the information) and returning this enumeration.
How can we use it? First let's see an example controller:
public MyController : Controller
{
  public ViewResult Index()
  {
    return View();
  }

  [Item("First item", Description = "This is the first item")]
  public ViewResult First()
  {
    /* ... */
  }

  [Item("2nd item", Description = "Another item - actually the second ...")]
  public ViewResult Second()
  {
    /* ... */
  }

  [Item("Third item", Description = "This is most probably the last item")]
  public ViewResult Third()
  {
    /* ... */
  }
}
Okay, so all (shown) actions except the Index action are decorated with an ItemAttribute attribute. This makes sense, since we (most probably) want to get the listing of all the methods within the Index view. Also in other views we might be only interested in the sub-actions and not in the index-action. The implementation of the attribute class is given in the next code snippet.
[AttributeUsage(AttributeTargets.Method)]
public sealed class ItemAttribute : Attribute
{
  public ItemAttribute(String name)
  {
    Name = name;
  }

  public String Name
  {
    get;
    private set;
  }

  public String Description
  {
    get;
    set;
  }
}
So how can we use our little generator? Actually it is not that hard. Let's see a sample generation:
var list = Generator<MyController, ItemAttribute>.Create()
  .Select(m => new MyModel
  {
    Action = m.Action.Name,
    Description = m.Attribute.Description,
    Name = m.Attribute.Name
  }).ToList();
The generator is independent of particular attributes, controllers or models. Therefore it could be used anywhere.
Tip 14: Automatic documentation for web API
ASP.NET MVC 4 added some great features along the line. One of my favorite features is the all new ApiController, which is called the web api. This makes creating RESTful services that follow the CRUD (Create / POST, Read / GET, Update / PUT, Delete / DELETE) principles quite easy. Here we can embrace HTTP with great automatic behaviors like OData handling, protocol (e.g. JSON, XML, ...) detection or the usual model construction.
Nevertheless if we provide an open API to specific functionality of our website's service, we are also required to provide a good and solid API, which lists and explains the various API calls. Writing documentation is hard enough, but Visual Studio helps us a lot in writing some inline documentation for our methods. As we already know, that inline documentation can be transformed to XML, which can be transported and read-out.
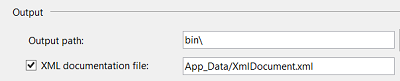
As shown above it is enough to activate the XML export and set a different path where the output should be written. The App_Data folder is a natural choice, since it is already configured to be used only internally. So access from the outside should be forbidden. This is what we want here, otherwise people could also see documentation for the rest of our code, which would give them indications on how our web application works.
Finally we might want to get a jump-start for a nice help page. The following NuGet command will do the trick:
Install-Package Microsoft.AspNet.WebApi.HelpPage
It installs a pre-configured help page. This help page is already installed if one started with a project of type MVC 4 web API application. Now only one more thing is required:
config.SetDocumentationProvider(new XmlDocumentationProvider(HttpContext.Current.Server.MapPath("~/App_Data/XmlDocument.xml")));
This snippet has to be placed inside the HelpPageConfig.cs file of the App_Start folder of the new help page. Additionally one step is required if one has not yet called the RegisterAllAreas method of the AreaRegistration class from within the global.asax.cs file.
Tip 15: Use strongly typed views
MVC is really a beauty, however, sometimes it follows the web spirit to closely by relying too much on strings. In my opinion it should always be possible to specify things by a string OR by something that might be caught when compiling. This gives flexibility during runtime but ensures robustness at compile-time. One way of calling views in a strongly typed manner is the small, but helpful StronglyTypedViews T4 template, written by Omar Gamil Salem. We can install the template over NuGet, simply by running the following command:
Install-Package StronglyTypedViews
Now could replace the following statement,
public ViewResult Product(int id)
{
    return View("Product", id);
}
with this version:
public ViewResult Product(int id)
{
    return MVCStronglyTypedViews.Products.Product(id);
}
Now that looks much longer than before and quite useless. In the presented scenario we could have also written the following:
public ViewResult Product(int id)
{
    return View(id);
}
Now there is also no string needed to specify the view (since we want the view that corresponds to the called action). But we have to remember two things here:
- Actions could be called directly (not redirected) from other actions, resulting in probably the wrong view to be shown (since the original action has been different). So we probably want to specify the view explicitly.
- We are passing in a model of type
Int32, which is the case because the view is actually strongly typed to anInt32model (this is just an illustration and should never be done in practice - even if we just have (for now...) an integer). But since the parameter is very general (just anObject), we could also pass in something different.
The second point is the real killer argument here. Suppose we made a small change in our code:
public ViewResult Product(Guid id)
{
    return View(id);
}
We would not see an error message. However, going on our webpage we would see one (and a really bad one: since this is during runtime!). So going for the strongly typed views will help us in three scenarios:
- Avoiding typos in view names
- Avoiding passing in the wrong model type
- Ensuring that we always talk to the right view
After having installed the NuGet package we have a new file called StronglyTypedViews.tt in the root directory of our solution.
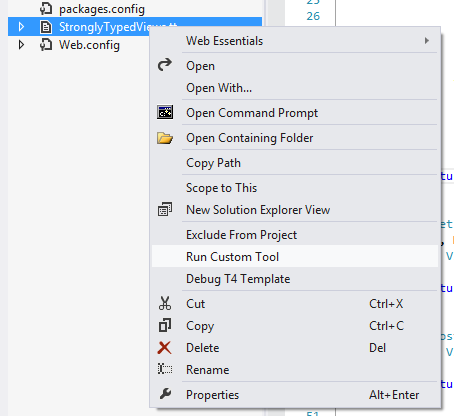
Right clicking on the file as shown in the image above gives us the option of running it. Well, that's all we need to do after having added new views!
Tip 16: Customizing error screens
Internal exceptions in ASP.NET MVC will be handled quite nicely. Here the convention of the Error.cshtml file in the shared folder is enough. This convention is actually implemented by a filter - in form of the HandleErrorAttribute. The filter is integrated in the global.asax.cs file.
public static void RegisterGlobalFilters(GlobalFilterCollection filters)
{
  filters.Add(new HandleErrorAttribute());
}
Personally I believe that the custom errors mode should always be remote only. We do not want expose anything about our system to the outside. Nevertheless what we really want is to provide a custom error screen in any scenario.
<-- place this in the system.web node -->
<customErrors mode="RemoteOnly" />
To archieve this we have to install an EndRequest handler. The code is placed in the global.asax.cs file and looks like the following.
protected void Application_EndRequest(Object sender, EventArgs e)
{
  ErrorConfig.Handle(Context);
}
Now the question is how the static Handle method of the ErrorConfig class is implemented. Here we simply look at the given status-code. We do not want to change the status-code, but we actually want to show a custom view. The best thing to do here is to create another controller and create it.
public class ErrorConfig
{
  public static void Handle(HttpContext context)
  {
    switch (context.Response.StatusCode)
    {
      //Not authorized
      case 401:
        Show(context, 401);
        break;

      //Not found
      case 404:
        Show(context, 404);
        break;
    }
  }

  static void Show(HttpContext context, Int32 code)
  {
    context.Response.Clear();

    var w = new HttpContextWrapper(context);
    var c = new ErrorController() as IController;
    var rd = new RouteData();

    rd.Values["controller"] = "Error";
    rd.Values["action"] = "Index";
    rd.Values["id"] = code.ToString();

    c.Execute(new RequestContext(w, rd));
  }
}
The controller itself might be as simple as shown below.
internal class ErrorController : Controller
{
  [HttpGet]
  public ViewResult Index(Int32? id)
  {
    var statusCode = id.HasValue ? id.Value : 500;
    var error = new HandleErrorInfo(new Exception("An exception with error " + statusCode + " occurred!"), "Error", "Index");
    return View("Error", error);
  }
}
What is really important here is to keep the ErrorController internal (here written explicitly for clarity). We don't want any user to invoke any action of this controller intentionally. Instead we only want that actions of this controller might be invoked if a real error occurs.
Tip 17: Remove the ASPX view engine
Most people use ASP.NET MVC with the Razor view engine. There are quite some arguments to pick Razor over ASPX, however, the people who want to stick to ASPX are also free to do so. Other view engines exist as well, and might be better for some people or in some situations.
By default MVC comes with ASPX and the Razor view engine. The actual choice does not matter here, it only affects in which language the standard views (if any) will be generated. If a view is missing we actually see, that paths for *.aspx have been searched as well. This search is of course a little bit expensive.
The following code is enough to remove all view engines.
ViewEngines.Engines.Clear();
ViewEngines.Engines.Add(new RazorViewEngine());
We should place it somewhere to be executed within the Application_Start method. Additionally it makes sense to disable writing the standard MVC response header. Adding specific headers to the response is actually kind of a security issue (not a big one), since we are telling other people about the implementation of our system (here one could spy that obviously ASP.NET MVC is used).
MvcHandler.DisableMvcResponseHeader = true;
This leaves our web app behind with optimized headers (saves a little bit of output generation time) and optimized search paths (no *.aspx files will be searched before searching for *.cshtml files).
Tip 18: Include HTML functions
Razor allows us to define functions within the code. Of course we wouldn't use it to simply generate math functions or LINQ queries, but to generate functions that return HTML - without the burden of doing the concatenation and managing the tags.
In order to create a function within Razor we only need the @helper directive. Let's see a simple example.
You have @PluralPick(Model.Count, "octopus", "octopuses") in your collection.

@helper PluralPick(Int32 amount, String singular, String plural)
{
    <span>
        @amount @(amount == 1 ? singular : plural)
    </span>
}
Now we can use the PluralPick function anywhere in the same view. What is even more useful is to create such helpers globally, i.e. for any view to use. How can this be done? Well, here the App_Code folder comes to rescue. This is kind of a special folder for ASP.NET MVC. Any *.cshtml file here will not derive from WebViewPage but from HelperPage.
Such a view will create public static methods out of @helper directives. Therefore it makes sense to create files like Helper.cshtml within the App_Code folder and place all (probably) useful globally helper functions in there.
Let's take the code above as an example and put the helper method inside a view called Helper.cshtml:
@helper PluralPick(Int32 amount, String singular, String plural)
{
    <span>
        @amount @(amount == 1 ? singular : plural)
    </span>
}
This is exactly the same code as above! Now what do we have to change in our original view?
You have @Helper.PluralPick(Model.Count, "octopus", "octopuses") in your collection.
We did not change much, but we are required to specify the name of the HelperPage, where the helper function is defined.
Using the code
I've compiled a small sample project, which contains actions for almost all tips here (or code fragments of the tip). You are free to use the code / adjust it or remove it as you wish.
Basically it is a MVC 4 web application that contains most of the tips. Some of the tips have been applied in some files, while others have been implemented as examples within the available actions.
Points of interest
Even though most tips will be known for every MVC developer I hope that some tips have been interesting and useful or at least fun reading.
If you have one or the other tip to share then go ahead and post it in the comments. As with the first article I would be more than happy to extend this article with your best tips and tricks around ASP.NET MVC.
References
- Practical ASP.NET MVC (3) tips
- Custom model binding using IModelBinder in ASP.NET MVC – two gotchas
- ASP.NET MVC4: Bundling and Minification
- The jQuery datepicker plugin
- The web essentials 2012 plugin
- The web essentials 2012 plugin
- The web essentials 2012 plugin
- TypeScript definition files database
- A very good LESS tutorial
- The official TypeScript tutorial
- Tutorial on Mvc Portable areas
- MVC Portable Areas: 3 years after
- StackOverflow discussion about simplifying SQL queries
- Creating Help Pages for ASP.NET Web API
- GitHub repository of the StronglyTypedViews library