Introduction
Uploading an image to a website is a task that is required in nearly every website. The requirement could exist due to a CMS background or due to user generated content like profiles, posts, and various other usages. A common problem is the lack of image editing options. We do not want to build a very rich editor in this article, however, we want to build an image uploader that can handle more than just plain file uploads. Additionally our image uploader should be able to perform an easy crop job.

Our image uploader will have (about) the same options as the one that is used by Google for uploading images in the contacts web application. We will include the following options:
- From the local file system (standard file upload)
- From another URL (resource from the internet)
- From Flickr (per image search, selecting an image from the list of results)
We will build everything with ASP.NET MVC 3 on the server-side. The client side will heavily use jQuery and a plugin called ImageAreaSelect. The plug-in will enable us to do (instant) cropping from the client's web browser. In order to preview images from the local file system we will use the FileAPI, which is available in all current browsers.
Background
The basic idea of this whole process is displayed below.
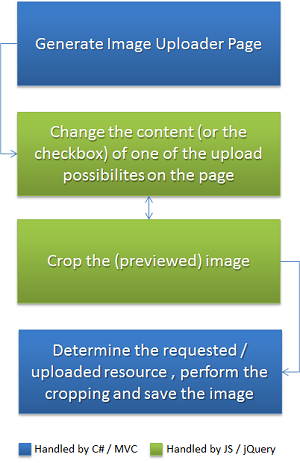
So ASP.NET MVC has the responsibility to generate the page (which does not need much generation since it is mostly static). Then our JavaScript code will handle the client-side events on the generated website. Those events affect mainly the <form> inside the page. Here we will offer the three possibilities (file upload, URL, Flickr). We need a checkbox to indicate the currently selected method. Some of the form's elements will be hidden and will be changed by the jQuery plug-in which helps us do the cropping.
We will not implement any fallback code, even though a non-JavaScript solution could be implemented as well. There are two main reasons for that:
- The whole thing of preprocessing an image before the image is actually uploaded is obsolete without JavaScript. Therefore a huge part of this article would be dispensable.
- The code would need to include funny things like previously hidden states that will be made visible again by JavaScript and vice versa. Overall any page that takes non-JavaScript browsers into account must first handle those users. The JavaScript will then modify the page for the second (usually much larger) type of users: those with JavaScript enabled. We do want to stay focused on our mission here.
Ready? So let's actually build this fancy Google style image uploader!
Implementation
We start with the "Internet Application" template from the ASP.NET MVC 3 package. For simplification, we just remove everything that has something to do with a database or user accounts. In general a webpage will have something like this - but for this mission, those two things are not required.
Let's start with the model that will actually be transferred from the client to the server:
public class UploadImageModel
{
    [Display(Name = "Internet URL")]
    public string Url { get; set; }

    public bool IsUrl { get; set; }

    [Display(Name = "Flickr image")]
    public string Flickr { get; set; }

    public bool IsFlickr { get; set; }

    [Display(Name = "Local file")]
    public HttpPostedFileBase File { get; set; }

    public bool IsFile { get; set; }

    [Range(0, int.MaxValue)]
    public int X { get; set; }

    [Range(0, int.MaxValue)]
    public int Y { get; set; }

    [Range(1, int.MaxValue)]
    public int Width { get; set; }

    [Range(1, int.MaxValue)]
    public int Height { get; set; }
}
So we named the model UploadImageModel. This is not a required convention like the *Controller convention for any controller. This is, however, very useful in order to distinguish between controller-view exchange models and all other classes.
The next thing to do is to generate some actions. We just place the following action method into the HomeController:
public ActionResult UploadImage()
{
    return View();
}
So this will just show the corresponding view. The URL to this action with the current (default) routing options is "~/Home/UploadImage". The request type should use the GET method. We will need another action for receiving the posted form data. This one should be created right before we come to the view and all the client side stuff. Let's have a look at the action first:
[HttpPost]
public ActionResult UploadImage(UploadImageModel model)
{
    if (ModelState.IsValid)
    {
        Bitmap original = null;
        var name = "newimagefile";
        var errorField = string.Empty;

        if (model.IsUrl)
        {
            errorField = "Url";
            name = GetUrlFileName(model.Url);
            original = GetImageFromUrl(model.Url);
        }
        else if (model.IsFlickr)
        {
            errorField = "Flickr";
            name = GetUrlFileName(model.Flickr);
            original = GetImageFromUrl(model.Flickr);
        }
        else // model.IsFile should be checked !
        {
            errorField = "File";
            name = Path.GetFileNameWithoutExtension(model.File.FileName);
            original = Bitmap.FromStream(model.File.InputStream) as Bitmap;
        }

        if (original != null)
        {
            var fn = Server.MapPath("~/Content/img/" + name + ".png");
            var img = CreateImage(original, model.X, model.Y, model.Width, model.Height);
            img.Save(fn, System.Drawing.Imaging.ImageFormat.Png);
            return RedirectToAction("Index");
        }
        else
            ModelState.AddModelError(errorField,
              "Your upload did not seem valid. Please try " +
              "again using only correct images!");
    }

    return View(model);
}
Now this looks pretty complicated in the beginning. What does the action do exactly? First of all the model is checked for validity. This is a rather simple check just involving the data annotations we've set up in our model. After the simple values have been checked, we can focus on more complicated stuff. We just look at each possibility (URL, Flickr, and upload from the local file system) and execute some methods in order to find out the filename as well as the image itself. Once we have the (original) image, we can apply further transformations. In this case we want to crop the image.
In order to work nicely, we've implemented some helper methods. Those could be included as extension methods. In this case, we've written the appropriate methods in the same controller in order to have everything in one place. Let's start with a rather easy one:
string GetUrlFileName(string url)
{
    var parts = url.Split(new char[] { '/' }, StringSplitOptions.RemoveEmptyEntries);
    var last = parts[parts.Length - 1];
    return Path.GetFileNameWithoutExtension(last);
}
This method just splits the URL into several parts. The last part must contain the filename of the image. Therefore we can apply the usual Path.GetFileNameWithoutExtension() method. The next method which could be interesting is the GetImageFromUrl() method. This one will request a webpage from any web server by a given URL and return the image.
Bitmap GetImageFromUrl(string url)
{
    var buffer = 1024;
    Bitmap image = null;

    if (!Uri.IsWellFormedUriString(url, UriKind.Absolute))
        return image;

    using (var ms = new MemoryStream())
    {
        var req = WebRequest.Create(url);

        using (var resp = req.GetResponse())
        {
            using (var stream = resp.GetResponseStream())
            {
                var bytes = new byte[buffer];
                var n = 0;

                while ((n = stream.Read(bytes, 0, buffer)) != 0)
                    ms.Write(bytes, 0, n);
            }
        }

        image = Bitmap.FromStream(ms) as Bitmap;
    }

    return image;
}
We first look if the passed URL is a real absolute URL. If this is the case, we can start our request. This request will stream the response data into the memory stream. This is needed in order to get a seekable stream. Afterwards we create an image from this memory stream. The image is finally returned.
The last method which can be detected in the code of our action is the CreateImage() method. This method will basically do the cropping. The code is straightforward for anyone who is familiar with GDI+.
Bitmap CreateImage(Bitmap original, int x, int y, int width, int height)
{
    var img = new Bitmap(width, height);

    using (var g = Graphics.FromImage(img))
    {
        g.SmoothingMode = SmoothingMode.AntiAlias;
        g.InterpolationMode = InterpolationMode.HighQualityBicubic;
        g.DrawImage(original, new Rectangle(0, 0, width, height),
                    x, y, width, height, GraphicsUnit.Pixel);
    }

    return img;
}
In order to conclude the server-side of our code, we need to attach the corresponding views. In our case, we just have one view to attach: UploadImage.cshtml (yes, we are going to use Razor as the view engine for this article). In order to maximize our efficiency, the first draft will be scaffolded by using UploadImageModel as model and Create as the scaffolding option. The resulting HTML is far away from our final goal. Why should we still use the scaffolding option? Well, first of all it is a good testing point. Of course unit testing our controllers is a much better test, but sometimes all you need is a one time "does it already work?!" test. If this is the case then we just did provide a testing environment within a second. The second reason to use the scaffolding option is that we have already a good basis. From this point on, everything we have to do is deleting, moving, and maybe adding something.