
Table of Contents
- Introduction
- Background
- The game engine: Quantum Engine
- The game
- Platform considerations
- Using the code
- Points of interest
Introduction
A while ago a colleague and I participated in the Intel App Innovation Contest (AIC) 2013. Even though the games category is not as predictable and depending on (classical) programming skills as other categories, we tried our best to overcome our graphical deficiencies. In the end we managed to deliver a fun game that made it at least to the Top-5 games of the competition. We've been quite happy about that success.
From that moment on we planned on releasing the game on the CodeProject. Obviously it took a while, but here is the associated article. During the next paragraphs I will guide you through the game, the logic, as well as design decisions and an analysis. The whole article will be discussed in the context of cross-platform applications. Of course we now have the ability to write universal apps, i.e. applications that support us developers in sharing code between, e.g. Windows Phone 8 and Windows 8 apps, however, being cross-platform between Windows Store and Windows (WPF) is still not that easy.
We will see how we can use portable class libraries as a solid foundation for sharing code. The article will also demonstrate efficient (and not-so-efficient) ways for making code portable with the .NET-Framework. Finally I hope to demonstrate an architecture that is extensible, portable and flexible.
Background
Shortly after I started writing articles for the CodeProject I created a game called SpaceShoot. I wrote it in a couple of hours as a demo project for a lecture I was giving on HTML5. Nevertheless it turned out to be quite a fun project and has been popular among CodeProject readers, my students and friends. For the AIC 2013 we decided to create a remake - a game that is worth being a successor. Instead of HTML5 our platform of choice has been WPF. The main reason for this was the interaction with the touch layer.
In retrospect this was not the best decision. We lost more than a week figuring out how to do multi-touch efficiently with WPF. It turned out to be an old topic with unsolved issues. Some of those issues came from WPF design choices, some from our own blindness. In the end we had a solid solution, but it took us longer than expected. The good thing about WPF was, however, that the game has been placed on a really solid code base with great flexibility and extensibility.
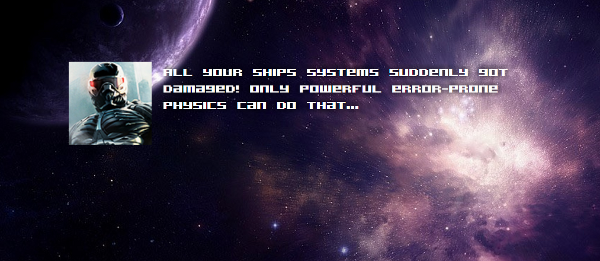
We wanted to create the ultimate asteroid shooter simulation. Shortly after we implemented the physics we had to implement helpers, since the game turned out to be very hard to control. Every laser shot, every collision or acceleration had some very realistic impacts. To counter the accumulation of those impacts turned out to be a tough challenge for any player. Without a proper reaction of the player the control over the ship was lost inevitably. We implemented inertia dampers, steering helpers and others, just to control the space ship as if it would be a car. This is the same behavior as in the original game, however, we are more realistic and that can be used on several other occasions.
The ship contains a damage model, which then could be turned on to disable standard ship systems. An example of such a system would be the mentioned inertia dampers. If those are turned off by laser shots, collisions or other influences, the inertia effects won't be suppressed. Before we discuss the consequences (advantages and problems) of our design in detail, we will first have a look at the technical side of our application.
The game engine: Quantum Engine
Every game requires some kind of game engine. Even very simple games may have some core that could be considered a game engine. For real time games this is much easier to identify than for other kind of games.
Basically a game engine consists of two important blocks:
- A logic manager, usually coupled to fire at fixed time intervals.
- Asset management - i.e. drawing graphics or playing some sounds. This acts in real-time.
It is not only a good practice to keep these components as decoupled as possible. It will also result in a much cleaner game design. I've witnessed students, who started mixing these components and ended up in some kind of coding hell. If you logic depends on a certain graphics state, you are basically lost. For instance: If a laser is currently shot should not depend on the current draw state. It does not matter if we already show an image of the laser. It is either fired or not.
On the other side objects might already be out of our logic, when they are still drawn. Consider little graphic effects such as dust, explosions or other effects. The corresponding object has already been removed from the logic. It cannot interact any more. However, its remains are still visible.
It is also important that the logic manager acts separately from the visuals. Games always want to redraw the screen as often as possible. Maybe one wants to throttle down the frame-rate due to some energy saving desire, but that would be achieved naturally by just limiting the GPU for hardware accelerated graphics or the CPU for (partial) software rendering. Needless to say that these decisions should have no impact on the logic. Therefore we want the game to have the same logic on a 1 GHz Intel i3 CPU as well as on a 3 GHz Intel i7 CPU. The operating system is responsible for giving us a callback at fixed time spans.
The logic is responsible for a variety of tasks:
- Managing the objects, called entities. That includes adding, removing or checking if the entity is still alive.
- Updating the logic of each entity.
- Managing the controllers, e.g., keyboard and touch.
- Checking for collisions between entities.
- Providing a bridge to the asset management, to enforce separation.
The last point sounds like a contradiction to the general concept of decoupling logic from asset management. However, we will see that this is crucial for the separation.
The separation works only if there is a general pipe that passes data to independent worker units. But in our case this is not so easily possible, since such a pipeline would be required to work either at the speed of the rendering engine, or the logic engine.
If this pipeline would work at the speed of the rendering engine, it would fire all the time. We would then not be able to execute the logic engine (at least not at every execution). On the other side if the pipe would work at the speed of the logic engine, the logic would be required to wait for the rendering to complete. Additionally the rendering would not be as fast as possible, probably resulting in an unsatisfactory experience for the player.
Therefore the whole pipeline approach is unfortunately not possible. We have two pipelines - one that may be called logic engine and another that may be called graphic or rendering engine. Where do these engines get the data from? Well, we can make one of them self-sustained. Of course we choose the logic engine, as we prefer logic to display.
In essence such an approach makes the rendering engine dependent on the logic engine - but only on the data from the logic engine. We can make this dependency as small as possible, but it will be there. Therefore our logic engine also needs a way to directly speak to the graphic engine. All this has been integrated into the design of the quantum engine.
The game
The game contained a set of available modes. In principle it was quite easy to add another mode. Initially we offered the following set of modes:
- A single-player campaign
- A multi-player (like deathmatch) mode
- A team mode
The campaign mode contained a non-linear story-line, where certain actions and decisions influenced the upcoming mission or changed the taken story path. Even though designing such a system is a lot more work (a lot more levels are required, logic for changing mission objectives depending on certain conditions and more has to be implemented), it definitely pays off in terms of fun and flexibility of the game.
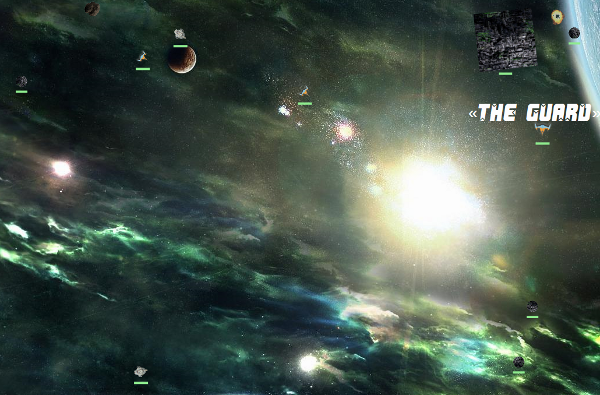
Also the campaign allowed to introduce short mission objectives with text based briefings. All these scenarios can be handled within the engine, there is no hack or work-around required. The following screenshot shows such a briefing in action.
In Quantum Striker the player is using a ship that has limited health points, shields and ammo. The ship may contain a set of bombs that might be used to detonate. Additionally the ammo is limited for laser shots. The primary (laser) weapon can be upgraded.
- There are asteroids and AI controlled opponent ships. While asteroids might be avoided, AI controlled ships have to be shot. Otherwise they are very likely to perform serious damage to the player's ship.
Rules, graphics and sounds
Some graphics are directly based on XAML, but most graphics are stored as bitmaps. There is a huge variety of ships included. For instance in the following screenshot we see a drone mothership (right side, basically what is known as a Borg cube), spherical drones (looking like asteroids, but with health bars) and standard drones.
The player's ship is only available is a bitmap graphic. For supporting multiple players, this bitmap graphic exists in multiple colors (red, green, yellow, blue, ...). It would have been possible to do it all in XAML, but in the end the level of detail and simplicity of a bitmap have been our reason for staying with the bitmap approach.
Nevertheless for the player's HUD (heads up display) we wanted to show an expressive graphic basically illustrating the ship. In this graphic we display the current ammo, working systems and available bombs. This graphic should be shown in the player's color.
Since this graphic is basically just a line with variable information, it was an obvious choice for choosing XAML as our language of implementation. The HUD therefore is defined as follows:
<UserControl x:Class="QuantumStriker.Xaml.Hud"
                xmlns="http://schemas.microsoft.com/winfx/2006/xaml/presentation"
                xmlns:x="http://schemas.microsoft.com/winfx/2006/xaml"
                Height="120"
                Width="200">
  <Viewbox>
    <Canvas Height="150" Width="250">
      <Path Data="M0,0 L50,0 L50,20 L70,35 L90,15 L160,15 L180,50 L230,50 L230,55 L250,55 L250,65 L230,65 L230,70 L180,70 L160,105 L90,105 L70,85 L50,100 L50,120 L0,120 L0,90 L20,90 L20,75 L0,75 L0,45 L20,45 L20,30 L0,30 Z"
               x:Name="HullFrame"
               Stroke="SteelBlue"
               StrokeThickness="1"/>
      <Path Data="M100,40 L110,30 L140,30 L150,50 L150,70 L140,90 L110,90 L100,80 Z"
               x:Name="CoreFrame"
               Stroke="DarkGray"
               StrokeThickness="1"/>
      <Path Data="M110,50 L140,50 L140,70 L110,70 Z"
            x:Name="CockpitFrame"
            Stroke="DarkGray"
            StrokeThickness="1"/>
      <Image x:Name="Battery"
                Canvas.Left="109"
                Canvas.Top="44"
                Width="32"
                Height="32" />
      <Path Data="M60,55 L60,65 L35,80 L45,65 L45,55 L35,40 Z"
               x:Name="BombFrame"
               Stroke="LightGray"
               StrokeThickness="1" />
      <Path Data="M180,50 L230,50 L230,55 L250,55 L250,65 L230,65 L230,70 L180,70 L190,60 Z"
               x:Name="LaserFrame"
               StrokeThickness="0" />
      <TextBlock Text="0"
                    FontFamily="../../Fonts/#Acknowledge TT BRK"
                    x:Name="BombText"
                    FontSize="28"
                    TextAlignment="Center"
                    Foreground="SteelBlue"
                    Width="30"
                    Canvas.Left="67"
                    Canvas.Top="45" />
      <TextBlock Text="1000"
                    FontFamily="../../Fonts/#Acknowledge TT BRK"
                    x:Name="AmmoText"
                    FontSize="28"
                    TextAlignment="Right"
                    Width="60"
                    Foreground="SteelBlue"
                    Canvas.Left="190"
                    Canvas.Top="80" />
      <TextBlock Text="The main reactor is broken."
                    x:Name="Message"
                    FontWeight="Light"
                    FontSize="16"
                    TextAlignment="Center"
                    Width="250"
                    Foreground="SteelBlue"
                    Canvas.Left="0"
                    Canvas.Top="125" />
    </Canvas>
  </Viewbox>
</UserControl>
Basically we use a Viewbox to provide scalability. The UserControl then uses a Canvas for drawing a path that will be the outline of the ship. Various text blocks and images are placed on interesting positions. We do not use any binding (everything will be set in the code behind and our game engine does not know about WPF) and the information can only be updated in the update step. This will be done by the game engine, which is why we circumvent MVVM binding altogether.
The layout of the game has been designed in such a way, that the controls will be displayed on the screen. Therefore the touch controls are present for players that use the touch screen - and they are presented in a semi-transparent way. Also the HUD is shown with some transparency, to be as unobtrusive as possible.
The next screenshot illustrates the beginning of a multiplayer match. Here we choose a scenario with 4 players. This is currently the maximum, which might be increased by implementing a multi-player mode that is based on TCP/IP or network connections in general.
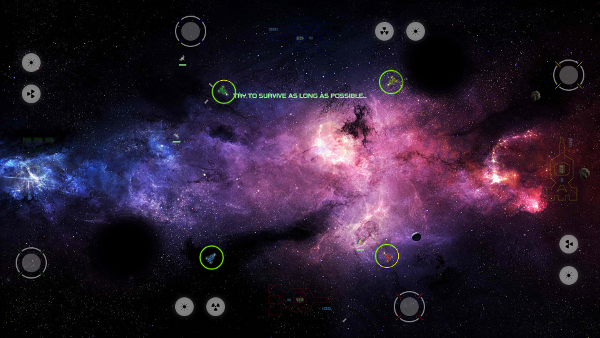
We see that the standard touch control consists of two fire buttons (left side, with the left button firing the laser and the right one being the eject bomb button) and some kind of position field. The latter could be used together with the finger. In this case it basically represents something like a steering / accelerating circle. Usually this panel would be used to place a special kind of touch-joystick on it.
This joystick panel, as well as the other touch controls, have been designed again with pure XAML. The XAML code for the panel is given in the next code snippet.
<UserControl x:Class="QuantumStriker.Xaml.JoystickPanel"
                xmlns="http://schemas.microsoft.com/winfx/2006/xaml/presentation"
                xmlns:x="http://schemas.microsoft.com/winfx/2006/xaml"
                Height="100"
                Width="100">
  <UserControl.Resources>
    <SolidColorBrush x:Key="Inner"
                        Color="#55CCCCCC" />
    <SolidColorBrush x:Key="Outer"
                        Color="#AABBBBBB" />
    <SolidColorBrush x:Key="Line"
                        Color="#AAFF0000" />
  </UserControl.Resources>
  <Grid>
    <Ellipse Margin="0"
             StrokeThickness="4"
             Stroke="{StaticResource Outer}">
      <Ellipse.Clip>
        <GeometryGroup>
          <PathGeometry>
            <PathFigure StartPoint="10,0" IsClosed="True">
              <LineSegment Point="50,50" />
              <LineSegment Point="90, 0" />
            </PathFigure>
          </PathGeometry>
          <PathGeometry>
            <PathFigure StartPoint="0,10" IsClosed="True">
              <LineSegment Point="50,50" />
              <LineSegment Point="0, 90" />
            </PathFigure>
          </PathGeometry>
          <PathGeometry>
            <PathFigure StartPoint="10,100" IsClosed="True">
              <LineSegment Point="50,50" />
              <LineSegment Point="90, 100" />
            </PathFigure>
          </PathGeometry>
          <PathGeometry>
            <PathFigure StartPoint="100,10" IsClosed="True">
              <LineSegment Point="50,50" />
              <LineSegment Point="100, 90" />
            </PathFigure>
          </PathGeometry>
        </GeometryGroup>
      </Ellipse.Clip>
    </Ellipse>

    <Ellipse Margin="20"
                Fill="{StaticResource Inner}" />

    <Line X1="7" Y1="7"
             X2="23" Y2="23"
             x:Name="Line1"
             Stroke="{StaticResource Line}" />

    <Line X1="93" Y1="93"
             X2="77" Y2="77"
             x:Name="Line2"
             Stroke="{StaticResource Line}" />

    <Line X1="93" Y1="7"
             X2="77" Y2="23"
             x:Name="Line3"
             Stroke="{StaticResource Line}" />

    <Line X1="7" Y1="93"
             X2="23" Y2="77"
             x:Name="Line4"
             Stroke="{StaticResource Line}" />
  </Grid>
</UserControl>
Sounds is a little bit more complicated. Basically we differ between sound effects (such as laser shots) and background music. While effects are stored as wave files, background sounds are stored as MP3 files. This is just logical, as effects are very small and playing them should be as direct as possible. Any decoding efforts would be just overhead, especially since the size of the file wouldn't change much. This is not true for background sounds. Here the size would be at least a factor 10 higher (depending on the selected bitrate).
The implementation of playing the sounds / music is really platform specific. We therefore use an abstraction layer that just defines how the sound system looks like. Then the platform specific layer creates a concrete implementation of such a system.
For WPF we based the sound system implementation on the well-known NAudio library. This is an extensive, nearly-complete library for playing, recording and manipulating sounds. We are only interesting in decoding (for mp3) and playing (for everything) sound streams.
For the Windows Store app we use SharpDX. This provides a nice abstraction layer to XAudio, which is a part of the Windows (8) API and could be accessed over DirectX.
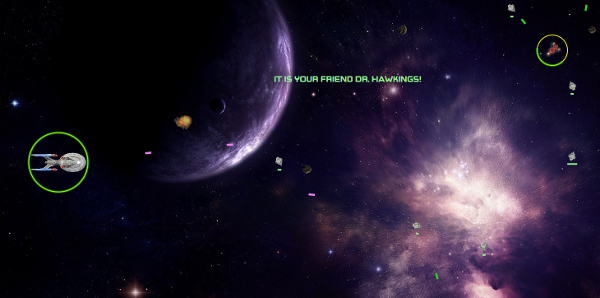
More information about the game is available on the picture below. Click to open the screenshot in its original resolution.

Logic and physics
The engine already defines what an entity is, and what base properties any entity should contain. Nevertheless, besides representing a basic connection to the (2D) game world, and containing the current state (alive, dead) of the object, it does not really express anything special about the given object.
So we need to derive from the entity to define what kind of objects we are dealing with. Lucky for us the engine already offers interesting start points for inheritance. For instance an OrientableObject that contains everything to be orientable.
If we are not satisfied with the given classes, we might just start from scratch. In the end it only matters if we implemented the correct interfaces. In our case we started by inheriting from OrientableObject to create yet another important base class called MoveableObject. This one extends the orientation with a kind of velocity. This velocity then just gets added to the location in every update step.
Additionally we also include AngularVelocity. Here we make use of the Orientation property, that is offered by the OrientableObject base class.
abstract class MoveableObject : OrientableObject
{
  // ...

  public override void Update(IGame g)
  {
    base.Update(g);
    Location += Velocity;
    Orientation += AngularVelocity;

    if (collisionCoolDown > 0)
      collisionCoolDown--;
  }
}
Moving on we might specialize this base class for several of our entities. A special group of entities is the group of all ships. Here we have additional specializations. Therefore it makes sense to have a common base class for this group as well.
We call this base class ControlledShip and implement several interfaces, that might be used to decorate other (non-ship) entities as well. Some of these interfaces are also of particular interest for the game engine. For instance the IDamageable tells the game engine that the object might be hit by other objects implementing the IDamaging interface.
This basically is the basis for the whole collision model, that runs automatically in the engine. The implementation of the ship abstraction has been coded as follows:
abstract class ControlledShip : MovableObject, IDamageable, IDamaging, IInterestedInStatistics
{
  // ...

  public override void Update(IGame g)
  {
    base.Update(g);
    _laser.Update(g);
    _alternative.Update(g);
    _engineering.Update(g);
    var effectiveDamperQuality = _damperQuality * _engineering.InertialDamper.Performance;
    ExerciseControl(g, effectiveDamperQuality);
    var vN = Velocity.Norm();
    UseStabilisator(effectiveDamperQuality, vN);
    ImposeSpeedLimit(vN);

    if (HealthPoints <= 0)
    {
      g.PlayEffect(AudioDb.Effects.Explosion);
      g.Register(ExplosionFactory.Create(this, ExplosionFactory.ExplosionType.Explosion2));
      IsGarbage = true;
    }

    if (revengeTimer > 0)
      revengeTimer--;
    else if (revengeTimer == 0)
      HitDirection = null;
  }
}
Every specialization, such as DroneShip or PlayerShip derives from the given base class. As we can see in the specialization of the Update method, we are using the update step to also keep other objects current (such as the ship's engineering system and weapons).
A very interesting specialization is the enterprise. It is much bigger than most other ships, hard to control and used in an AI controlled form within the campaign. It also provides much stronger weapons.
Hence the ship also features a special kind of graphic, which is basically what you would expect.
The purple laser shots are fired by the specialized model. Another specialization is the general player ship. This class also implements some interfaces that are important for the game (not the game engine). Here we have the following code:
sealed class PlayerShip : ControlledShip, IDroneTarget, IPlayerShip
{
  public override void Update(IGame g)
  {
    base.Update(g);

    if (HealthPoints <= 0)
    {
      PlayerStatistic.IncrementPlayersRecursively(LastCollisionObject, LastCollisionObject);
      Statistic.Deaths++;

      if (Alternative.Ammo > 0)
      {
        g.Register(new BombItem
        {
          Location = this.Location,
          AngularVelocity = this.AngularVelocity
        });
      }
    }
  }
}
The IDroneTarget interface is used by the drone AI to determine what kind of objects should be treated as targets. The IPlayerShip is practically only an indicator if the class could be used to instantiate an object that is purely controlled by a player.
With the same reasoning another interface called IDroneShip has been created. So we could dynamically create player and drone ship factories. This could be used for, e.g., some funny mode, where each player either may select the ship to use, and / or (random) waves of the same opponent ships have to be defended.
Platform considerations
Let's remember what this article is about. We wanted to create a cross platform game. The two platforms of matter in this case are Windows (by using WPF) and Windows Store. For both platforms we use C# as our programming language of choice. Even though it is not required to use the same language on all platforms, it makes sharing code a lot easier. Otherwise we may be limited with an ABI between the different code snippets. ABIs, however, are highly platform specific and may be the least favorite way of providing cross-platform capabilities.
Usually we want to be able to communicate between our code snippets and to compile everything (our whole code) to a specific platform. This ensures consistency and will eventually result in the easiest and most reliable way of creating cross-platform projects. Otherwise we would always be in doubt if our changes did break something.
What can be shared?
Of course there are limitations to sharing code. In the end it usually does not matter how different two platforms are. If we deal with two platforms, we will always depend on wrappers for system calls. The exclusion is POSIX compatible, but since we are dealing with a .NET application, we can forget about such an exclusion. Plus we already have a powerful wrapper with the .NET-Framework.
But wait a second! Why this long talk about sharing code if .NET does everything for us? Well, actually that would be a dream. But the reality is more close to a nightmare. Basic abstractions are (in theory) shared. For instance we can create a console application that uses classes from the System.IO namespace for reading and writing files. Compiling and running this code works on MacOS and any Linux distribution using the Mono compiler. This is what I would call portable.
However, once we introduce the concept of a sandbox and specialized environments even the given example will probably stop working. On some platforms there is no direct way of accessing the file system. Therefore such an abstraction might not exist. This is the concept of a Portable Class Library. It basically determines the lowest common denominator that fits a given number of platforms. So if we pick 4 platforms and one does not contain any direct way of accessing files, we will also not have this possibility in the PCL project.
This concept is universal. It basically determines what can be shared. Everything that is common on a given set of platforms can be shared. Everything else has to be introduced by the techniques mentioned in the following section.
Of course we can try to introduce a classification. In my opinion there are three parts that determine how much code might be shared.

UI is probably the most common part. Even if a framework provides the same abstraction for a set of platforms, it is usually a wise decision to avoid sharing UI code (in the long run). Platforms differ not only by look, but also by feel. Therefore any decision that will result in the same look and feel for different platforms, will ultimately fail against other applications, that provide a platform specific solution.
IO might be hard to share as well. Sometimes there are no abstraction or not even accessible UI capabilities available. Then we might also not be able to share any code. Even if we can share code, we should work on a common base, i.e. only handle FileStream or Stream in general. The input can then be more specific, according to the platform.
Finally libraries and the given framework in general. This is usually the easiest part. For instance if the given platform supports .NET 4.5, we might use async / await. If the platform does not even support .NET 4.0, we cannot use Task at all. There are variants, exclusions, subsets and much more. In the end we have to determine what we want to use, and what we have to use. Sometimes (re-) creating these classes is not hard. Sometimes there are NuGet packages available. The important point here is, to always have a rough plan what will be required.
Code sharing techniques
There are a number of sharing techniques. The combination of Visual Studio together with C# / .NET provides an excellent basis for code sharing. Considering for instance C++ code, we are already in quite comfortable zone.
We will start by looking a little bit more closely at the concept of PCL. This concept is what powers solutions like universal apps, but also helps us in creating a shared basis between WPF and Windows Store.
In the following we will start by pure code sharing. Then we will discuss more and more techniques that are useful when pure code sharing, i.e. full support of a given piece of code in all platforms is available, is impossible.
Portable Class Libraries
A Portable Class Library (PCL) is a special kind of project type, that tries to help developers to create a library, which can be referenced from various platforms. The library is our shared code model. In the end we will try to put as much as possible into a Portable Class Library, since we can target it very easily from a bunch of platforms.
In the case of this article we just use two platforms: WPF (.NET 4.5) and Windows Store (8.1). This restricts the subset of .NET and includes other methods. In general we can say that the more platforms we try to target with our PCL, the smaller the available subset of the .NET-Framework will be.

The subset of the .NET-Framework is represented by the intersection in the picture above. An intersection of N platforms will never contain more elements than the intersection of N - 1 platforms. This can be continued until we find that it is almost certain to have a natural limitation as compared to just support a single platform.
Using the PCL as a basis eliminates almost all the upcoming techniques. But wait! Why are they then still listed here? Because in the end we will specifically target a certain platform. There is no Portable Application project. So specializations have to be included at some stage. And of course these specializations should be as flexible and maintainable as possible. Hence we require some techniques for efficient code sharing and some elegant preparations.
An important tool is the ability to just link against files within Visual Studio projects. Usually if we add items to a project, Visual Studio will either copy an original file, or create a new one. This is not what we want. If we have two copies of a file, we need to make the same changes to both files. Sometimes we want only a fraction of a file to be shared across several projects, with a certain part being specialized. This will be covered in the next section.
However, before we discuss this technique, we should clarify how the common part can be shared efficiently between various projects. The most elegant way is to create a link to an existing file. So we open a new dialog to add an existing item to the desired project:
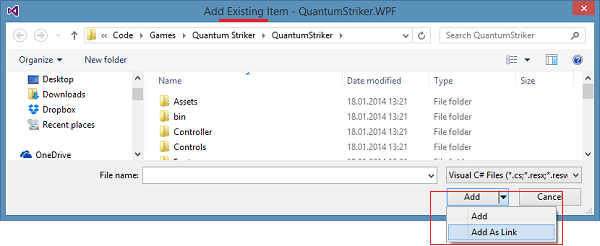
Please note that just double clicking on a file will result in creating a physical copy of the file. This is not what we want. We have to select "Add As Link" explicitly. Now we just added a reference to the file within the project, i.e. there is no physical file on the given location. Linking files is really important for sharing code between multiple projects.
Now that we know how to link files for sharing code, let's see how we can make that very efficient, such that only a minimum of changes is required for each platform.
Partial classes
The idea of a partial class is simple. In order to avoid having a file that contains a single class with possibly thousands of lines we might split up the class into parts that will be saved in different files. Initially that was introduced to solve the problem of mixing designer generated code and user code. Finally it was possible to hide the auto-generated code in an unobtrusive manner.
This concept, however, can be used to reduce copy / paste and therefore maintenance for sharing a class that consists partially of code that can be shared, and partially of code that cannot be shared. We start with the following construct:
//MySharedClass.cs
public class MySharedClass
{
  /* Code that can be shared */

  /* Code that cannot be shared and must be (re-)implemented for (each or at least some) platforms */
}
Now of course we need to add the partial keyword. Additionally we should create the platform specific partial implementations.
//MySharedClass.cs
public partial class MySharedClass
{
  /* Code that can be shared */
}

//MySharedClass.WPF.cs
class MySharedClass
{
  /* Specific code for WPF */
}

//MySharedClass.WindowsStore.cs
class MySharedClass
{
  /* Specific code for Windows Store */
}
Now the only question is: Where to place these files? There are many possible answers to this question. We can filter these answers if we have a strong opinion how to organize our code. Let's consider:
- All platforms are equally important.
- One platform is more important than others.
- There are more important platforms and more complicated platforms. But it is really mixed.
In the first case we might want to create a solution folder that contains all the partial class files. Each project now gets a link to this partial class file and its own implementation for the specific code section, i.e. a physical file that extends the linked partial class file.
In the second case we could create everything on one platform first. Then the other platforms will get a link to the partial class file that is contained in the more important platform project. However, every project will still have a physical file that contains the specific code, which extends the partial class file.
Finally in the mixed scenario we might want to either follow the way demonstrated in the first scenario, or the way in the second scenario (but for each project). Of course the first way might be a lot more organized, however, the second way may be more straight forward. In the end we should not mix the two approaches. That means we should not have a shared folder, but still provide some shared implementations physically within a specific project. Either we follow the "originates has physical" pattern, or the "shared within shared" method.
Extension methods
Extension methods are true gold. If you don't believe me then think about the following: What makes LINQ possible? Is it lambda expressions? Elegant, but well, I could just pass in references to existing functions or create anonymous functions using the delegate syntax. Is it the possibility to write SQL like code in C#? Personally I don't like it and I never use it. The only advantage I see is an easier declaration of intermediate variables using the let keyword, however, I usually prefer doing it manually. Which brings us back to extension methods. Without them we would write onion-like LINQ code that would look similar to the following:
var dataSource = new [] { 1, 2, 3, 4, 5, 10, 15, 20, 26 };
var querySet = SomeClass.Take(SomeClass.Select(SomeClass.Where(dataSource, m => m % 5 == 0), m => m * m), 3);
Here I just pretend that all these methods can be found in the same class that is called SomeClass (within the usual namespace System.Linq). I know you can guess what the call does, however, I am also sure that you needed some seconds before you fully understood the code.
Let's see how this changes with extension methods:
var dataSource = new [] { 1, 2, 3, 4, 5, 10, 15, 20, 26 };
var querySet = dataSource.Where(m => m % 5 == 0).Select(m => m * m).Take(3);
The onion is now a nice pipe. We start on the left and end on the right. We can read it like we read a sentence. That's just wonderful. My point now is not, that we start from left to right, but that the class SomeClass is completely missing. We just don't have to know what it is called. This is super great for refactoring. Does it matter what the name of the class that provides these methods is? No. Only the namespace matters and that it is included in the compilation process.
And this ability comes in very handy for sharing code. But before I go into details I have to warn you. There are limitations to sharing code using extension methods. And most of these limitations come from the word methods. If we deal with properties, concrete class names or other special cases we are lost.
Let's consider reflection as an example. In the following snippet we just want to find out if a given Type instance if the subclass of another Type object. Usually we have:
var result = typeof(FirstClass).IsSubclassOf(typeof(SecondClass));
The code snippet has been implemented in .NET (e.g. version 4.5). However, once we try running this snippet on the Windows Store application, we will see that it won't work. Reflection (out-of-the-box) does only offer limited possibilities. A little bit more can be accessed by using the GetTypeInfo() extension method, which can be found in the System.Reflection namespace.
var result = typeof(FirstClass).GetTypeInfo().IsSubclassOf(typeof(SecondClass));
This gives us two possibilities:
//First possibility:
public static bool IsSubclassOf(this Type origin, Type compare)
{
  return origin.GetTypeInfo().IsSubclassOf(compare);
}

//Second possibility:
public static Type GetTypeInfo(this Type origin)
{
  return origin;
}
The first possibility let's use us the WPF code within a Windows Store app. The second one describes the scenario the other way around. Here we can use the code from the Windows Store app within a WPF application. Which one is better? It depends! Both have advantages and pitfalls.
Let's start with a simple observation: While the "real" GetTypeInfo method from Windows Store applications returns a TypeInfo instance, we just use the method to return the identity, which is of type Type. This will usually work when the type is inferred or implicitly used. But once we require specific methods from TypeInfo or need to create variables with explicit types, we are out of luck. Additionally this already illustrates a major problem: Methods may differ by their name, signature or other properties. This is actually one of the reasons for the GetTypeInfo() method.
Having a specific method such as the IsSubclassOf also just works if the signature matches. In reality it makes more sense to implement extension methods for all platforms. That way, one does not need to worry about placing the extension methods on the right places. The methods exists on every platform, but is specifically implemented for each platform individually.
We would have:
//In the Windows Store project
static WindowsStoreExtensions
{
  public static bool DerivesFrom(this Type origin, Type compare)
  {
    return origin.GetTypeInfo().IsSubclassOf(compare);
  }
}

//In the WPF project
static WpfExtensions
{
  public static bool DerivesFrom(this Type origin, Type compare)
  {
    return origin.IsSubclassOf(compare);
  }
}
Now a shared code could just use the DerivesFrom method, without worrying. Additionally such a strategy allows us to circumvent implementation details and properties. Instead of properties we would use methods.
Let's have a look at an example, which illustrates this solution again:
//In the Windows Store project
static WindowsStoreExtensions
{
  public static IEnumerable<PropertyInfo> ListProperties(this Type origin, BindingFlags flags)
  {
    return origin.GetTypeInfo().DeclaredProperties;
  }
}

//In the WPF project
static WpfExtensions
{
  public static IEnumerable<PropertyInfo> ListProperties(this Type origin, BindingFlags flags)
  {
    return origin.GetProperties(flags);
  }
}
Even though obtaining the properties using the TypeInfo object in Windows Store applications is based on accessing a property, we can hide this detail in the concrete implementation. We should note, however, that we extended our signature to support an additional BindingFlags argument. This one is then not used in Windows Store, but we still need to supply it.
It should not be the default case, but it might happen at some point. It will definitely happen that one platform has more capabilities than another. This is nothing to worry about, unless these restrictions will result in different behaviors. Once we encounter this, we need to adjust the implementation. In the end our goal should be to have similar / equal results on different platforms from a code behavioral perspective.
Interfaces and object-oriented programming
The ability to have code that might be shared across different platforms can be divided into two categories, as we have seen. On the one side we have the library top-to-bottom approach, where we specialize within each library. In the other approach we have a side-by-side strategy, where we originate in one library and link to the original source file in another library.
Whatever we do, we need some structure in the code. If we have too strong platform dependencies, we cannot place the code in a more general library. Additionally it is impossible to just link against the file (at least without using the techniques mentioned before, and after this section).
To gain a proper structure we have to go back to the principles and patterns of OOP. By using SOLID (especially OCP and DIP) principles, we will structure our code to have enough abstraction and generalization to fit into either model (top-to-bottom or side-by-side).
Now we see why interfaces are crucial for cross-platform development. On the one hand we follow DIP and base everything on abstraction, an abstraction that does not depend on details. On the other hand we may implement an interface on whatever class we'd like to - even though we already have to implement another class.
Therefore our strategy is to always absorb as much cross-platform (independent) code as possible into base classes. Specializations that maybe have some kind of third party dependency will be small and require abstractions. In this scenario I consider WPF to be a third party dependency.
The game engine follows this path naturally. Even though the rendering requires some kind of UI object, it does not depend on WPF. Instead it just requires objects of type IDrawableEntity. This contains everything the rendering engine needs to know. In a concrete implementation the rendering engine may require further information, but this is not the problem of the general definition.
Dependency Injection using an IOC container
To follow the patterns described in the previous section we should also expose dependencies over properties or the constructor. This will reduce couplings as some class does not need to know where to find a concrete implementation of some abstraction (interface).
Using a service locator or even better, an Dependency Injection system (that uses an IOC container), is therefore highly recommended. This basically automates the creation of objects by resolving the dependencies.
Defines
Sometimes all the techniques mentioned previously fail. A great example is delivered by XAML code. While XAML code itself is mostly portable between WPF and Windows Store applications (speaking of a UserControl that just uses controls, which are available on both platforms), the code behind is not.
Let's have a glance at the WPF version of the code-behind of a very simple XAML control.
using System;
using System.Windows.Controls;

namespace QuantumStriker.Xaml
{
  public partial class EnemyShip : UserControl
  {
    public EnemyShip()
    {
      InitializeComponent();
    }

    public void SetHealthBarTo(Double percent)
    {
      HealthBar.Width = 24.0 * percent;
    }
  }
}
That does not look too bad. Actually most people would not realize that changes are required for this snippet to run in Windows Store environments. Let's see how the Windows Store equivalent looks like:
using System;
using Windows.UI.Xaml.Controls;

namespace QuantumStriker.Xaml
{
  public partial class EnemyShip : UserControl
  {
    public EnemyShip()
    {
      InitializeComponent();
    }

    public void SetHealthBarTo(Double percent)
    {
      HealthBar.Width = 24.0 * percent;
    }
  }
}
Nearly the same code? Yes, indeed. But a very crucial change, that prevents, e.g., the partial class technique, from being applied. We need different namespaces! Wow. Thanks Microsoft! You actually keep the same names for 95% of your controls, but you change the namespace. Great job! Even though that might make sense on an organizational level, it does not make much sense for people who write (or want to share) code. Why? There is not even remotely a chance of having a collision between the WPF controls and the Windows Store controls. However, such a collision is the reason why we have namespaces in the fist place. What does that mean? Using a different namespace is just annoying.
But let's have a look on the bright side. We now have the chance to introduce the #define preprocessor instruction. It allows us to define symbols that can be evaluated using preprocessor statements such as #if. Even better, we can also define such symbols globally on a project level in the project settings. And the best: Sometimes such symbols are already defined. An example would be the DEBUG symbol, that is defined for the default project target Debug.
using System;
#if NETFX_CORE
using Windows.UI.Xaml.Controls;
#else
using System.Windows.Controls;
#endif

namespace QuantumStriker.Xaml
{
  public partial class EnemyShip : UserControl
  {
    public EnemyShip()
    {
      InitializeComponent();
    }

    public void SetHealthBarTo(Double percent)
    {
      HealthBar.Width = 24.0 * percent;
    }
  }
}
Of course we could introduce a symbol for every project. In general, however, it is much better to use an existing symbol. Lucky as we are, we can use the symbol NETFX_CORE, which is defined for Windows Store targets. Now we can use the exact same file in both projects.
Complete Rewrite
Sometimes everything fails and it is impossible to define a common interface, rely on extension methods or just switch some blocks of code using the preprocessor. Sometimes the most efficient thing is actually the least efficient, which is a complete re-implementation.
At first that sounds crazy. But if we think about UI related issues, we will eventually come to the conclusion that different platforms will not only provide different UI frameworks, they will also follow different UI behaviors and styles. Therefore we might need to re-work most of our (UI) code anyway. It should be obvious that starting from scratch is then better than trying to mimic the previous work. There are good reasons to support this statement.
In the end such a rewrite might therefore be beneficial for the user (better experience) and the programmer (less head scratching on how to share nearly 100% incompatible code). Nevertheless sometimes one should think before rewriting...
For instance maybe the code one thinks is incompatible may be re-used when just rewriting the various components for each platform. This way the code may be re-used and (even better), all other code may also be re-used. But such an approach is only possible if we constructed our UI on smaller blocks. And only if these smaller blocks are nearly independent. Once they have to interact, e.g., over drag-and-drop, with each other, we might be lost.
WPF specific
As we started with WPF, there are hardly any restrictions on this platform (from our point of view) regarding our code. However, in general Windows Store might be superior in some scenarios (especially touch). Nevertheless, besides some special areas we can always count that WPF offers more possibilities.
If we would start a project from scratch, it would make sense to design everything for the platform that offers the most restrictions. That way we will eventually run into less problems later on. If we design for the platform with the least restrictions, we will have to tweak our application as the current article shows.
Both ways are legit, but why should we do it the hard way? Again, in this case the application had already been written for WPF, requiring us to tweak the current code. In the end we can take away interesting lessons for designing and writing cross-platform applications.
The WPF specific connection to the engine is done over the following configuration file.
namespace QuantumEngine
{
  public class AvalonConfig : Config
  {
    static AvalonView view;

    protected override IEnumerable<Type> LoadTypes()
    {
      yield return typeof(AvalonSoundManager);
      yield return typeof(AvalonPresentation);
      yield return typeof(AvalonDebugBox);
      yield return typeof(AvalonTimer);
      yield return typeof(AvalonKeyboardInput);
      yield return typeof(AvalonMouseInput);
      yield return typeof(AvalonTouchInput);
    }

    internal static AvalonView View
    {
      get { return view; }
    }

    public static void Register(Window window)
    {
      view = new AvalonView(window);
    }
  }
}
The most important thing is the creation of an AvalonView instance, which basically builds upon the given Window instance (since this is highly WPF specific).
namespace QuantumEngine
{
  sealed class AvalonView
  {
    public event EventHandler<TouchCollectionEventArgs> Touched;

    Window parent;

    public AvalonView(Window window)
    {
      var source = PresentationSource.FromVisual(window) as HwndSource;
      parent = window;
      DisableWPFTabletSupport();

      if (source != null)
      {
        source.AddHook(WndProc);
        RegisterTouchWindow(source.Handle, 0);
      }
    }

    /* Touch specific native API handling */
  }
}
This special view instance is then used internally to connect the WPF specific controllers (e.g. AvalonTouchInput) to the event dispatchers.
Windows store specific
The Windows store part was definitely more head scratching. A big problem is audio. We solved this easily in WPF using NAudio, but as NAudio relies on native APIs and direct stream access, it is of course not available for the Windows store platform. A natural replacement appears with SharpDX. This is a nice wrapper around the DirectX API, which may be fully accessed within Windows Store applications.
However, even though this solution seems fully suited for our needs, there is one remaining problem: SharpDX can't handle MP3 files (at least without SharpDX.MediaFoundation). This is a huge drawback as the background sounds are saved in the MP3 format. Nevertheless, if we would really go this path to the end, we would just use a format that is compressed and readable by both platforms.
The configuration file for the Windows store app looks similar to the one from WPF. Here we wrote the following code:
namespace QuantumEngine
{
  public class MetroConfig : Config
  {
    static CoreWindow view;

    public MetroConfig()
    {
      view = CoreWindow.GetForCurrentThread();
    }

    protected override IEnumerable<Type> LoadTypes()
    {
      yield return typeof(MetroSoundManager);
      yield return typeof(MetroPresentation);
      yield return typeof(MetroDebugBox);
      yield return typeof(MetroTimer);
      yield return typeof(MetroKeyboardInput);
      yield return typeof(MetroMouseInput);
      yield return typeof(MetroTouchInput);
    }

    internal static CoreWindow View
    {
      get { return view; }
    }
  }
}
Again we are returning a collection of special types that are provided by our specialization of the quantum engine. Even though this is not a real service container, this is something like a very very lightweight and not fully flexible service locator. The Config class, as it is defined in the quantum engine (portable class) library, knows how to create instances of these provided types.
Here we do not need to define a special kind of view. In a Windows store application there is always a special class called CoreWindow. By using the static GetForCurrentThread() method, we can obtain the CoreWindow instance for the current thread. Since we know, that this part of the code will only be called from the main thread, we can simply use this method. In general, however, we would specify a dependency on CodeWindow. Then some other method would be required to resolve the dependency.
The controller implementations for the Windows store platform then may use this. The following code is the implementation of the touch controller.
namespace QuantumEngine.Controller
{
  sealed class MetroTouchInput : TouchInput
  {
    public MetroTouchInput(IGame game)
    {
      MetroConfig.View.PointerPressed += PointerHandler;
      MetroConfig.View.PointerReleased += PointerHandler;
      MetroConfig.View.PointerMoved += PointerHandler;
      Game = game;
    }

    void PointerHandler(CoreWindow sender, PointerEventArgs e)
    {
      if (IsCaptured && e.CurrentPoint.PointerDevice.PointerDeviceType != PointerDeviceType.Mouse)
      {
        var pos = e.CurrentPoint;

        if (pos.IsInContact)
          _touchPoints[(Int32)pos.PointerId] = new QPosition(pos.Position.X, pos.Position.Y);
        else
          _touchPoints.Remove((Int32)pos.PointerId);

        e.Handled = true;
      }
    }
  }
}
The controller basically uses the CoreWindow to register a listener for the most elementary and basic touch events available. As we use the CoreWindow, we can also be sure to handle the event in any case.
Using the code
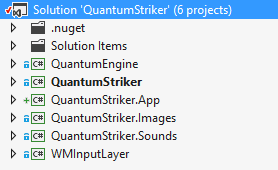
When the initial version was finished, the number of projects in the solution could be counted on one hand. The original layout of the solution looked like the following image:
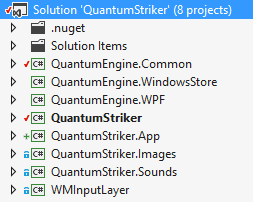
Of course the platform considerations for supporting two distinct platforms doubled some projects and introduced shared projects. In the end the solution has changed to look as follows:
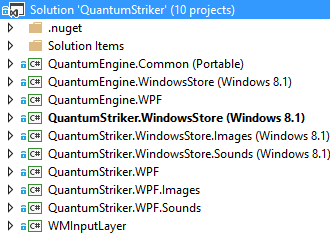
Needless to say that the given picture only shows half of the story. Here we just supplied another platform for the engine. It is obvious that the other parts might double as well. In the end we have 10 projects, where we started with 5. So we added 2 more projects for the engine and 3 more projects for the app.
We started with an engine that was tightly coupled to the input layer project. The first action has been to decouple this structure. This was done in three steps:
- Make the engine a PCL (targeting Windows Store applications and the .NET 4.5 framework).
- Introduce interfaces and other sharing techniques for code that might be implemented differently. Remove the dependency on the input layer.
- Create two more projects that provide the specializations. One project targets Windows Store applications, the other one .NET 4.5. The latter has to reference the input layer again.
Now we are already platform independent, since we just have to create another project, reference the specialized engine (in this case for Windows Store) and we are good. However, this would be a nightmare, as the application also contains a lot of code, e.g., the enemies, ships, story, ... and much more. Instead of re-creating or copying the code we use techniques such as linking other code, using defines or extension methods.
The high number of freshly created projects is quite unusual. In an ideal world the projects Images and Sounds/ would be portable. These projects just embed resources. However, resource management changed from .NET applications to Windows Store applications. This is really unfortunate, as I think that the old way was a lot more transparent, comfortable and extensible. Where is my byte stream now? Anyway, we can share the underlying resource (i.e. images and sounds), but we cannot share the projects. We need to create two separate projects, one for Windows Store and one for WPF, to provide resources.
Points of Interest
The delivered source code contains the full Quantum Engine and most assets. I only removed the sound tracks. The reason for this is a simple one: I did not want to upload dozens of MB just to give you a few sound tracks, that might not be interesting at all. I also removed all game modes except the versus mode.
The reason for excluding these game modes is a possible publish process as a Windows Store app. Currently we think about re-styling some parts and publishing the game as a free download on the Windows Store. We might include a network mode if we really publish the app. But that is no criterion for an initial submission.
History
- v1.0.0 | Initial Release | 13.07.2014
- v1.0.1 | Fixed download package | 14.07.2014
- v1.0.2 | Fixed some typos | 16.07.2014